How can I support students in managing file sizes when submitting online?
It is good practice for students to understand how to manage the size of files that are produced. This article provides guidance that should be provided to students when they are producing work to help make files more manageable and smaller in size.
Finding out the size of a file
Before submitting either to Blackboard or other means, students should firstly check the size of their files by:
- On a PC - hovering the mouse over the name of a file to see the size of the file or right-clicking on the file and choosing Properties.
- On a Mac - clicking on a file and press the Command button + i simultaneously
- For files stored in OneDrive - right-click on the file name and choose Details. In the right-hand panel that appears, click More Details.
Audio and video
The easiest way to reduce file sizes of audio and video files is to convert them to low bit rate MP3 (audio) or MP4 (video) files:
- Short extracts of audio files can be produced by cutting out the unrequired sections of the recording using software such as Audacity (which is available on all SHU Managed Desktop PCs, but is also freely downloadable). Audacity can also be used to record, edit, convert and export audio files in a variety of qualities and formats including MP3. 128Kbps recordings are generally acceptable, and for information a comparison of the different bit rates and file sizes generated is provided:
- A 5 minute MP3 recorded at 64Kbps uses around 2.3MB file space
- A 5 minute MP3 recorded at 128Kbps uses around 4.7MB file space
- A 5 minute MP3 recorded at 256Kbps uses around 9.4MB file space
- A 5 minute MP3 recorded at 320Kbps uses around 11.7MB file space
- Short extracts of video files can be produced by cutting out the unrequired sections of the recording using software that already come installed with operating systems such as Windows Movie Maker (PC) or iMovie (Mac). Both allow the recording, editing, converting and exporting of video files in a variety of qualities and formats including MP4. A 5 minute MP4 video of ‘normal’ quality uses around 8.7MB file space compared with a video saved as AVI that will use 30.4MB file space.
- Where video has been created using an iPad or iPhone, there is a freely available app called Video Compressor – Just set the target size!. A target file size can be set for any video, and once compressed the video can be transferred to a computer using either the freely available Send Anywhere app or the USB cable ready for submission to Blackboard.
Word and PowerPoint files
Images within Word and PowerPoint files can be quickly compressed which will help reduce the overall size of the document by:
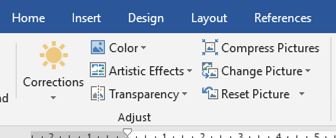
Step 1: Clicking on an image in the document or presentation. The Picture Tools/Format tab will appear in the ‘ribbon’.
Step 2: Clicking Compress Pictures.

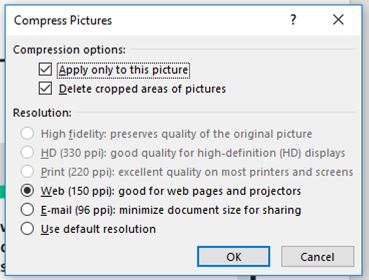
Step 3: Selecting the compression options. Settings can be applied to images individually or to all images simultaneously. Click OK.

Step 4: Finally resaving the document or presentation, using Save As to create a new smaller version of the file. Some trial and error may be required of the different compression settings to reduce the size of the file sufficiently before submitting for marking.
To note: If students follow the above guidance and are still unable to compress their files below 250MB, they should be advised to contact their module leader.