How can I enrol students on an organisation site?
Course administrators or organisation leaders are responsible for managing student enrolments on organisation sites. Enrolling or unenrolling students is an immediate process.
Student enrolments on all module sites is managed automatically through a link with the Student Management System (SITS).
The process is the same for enrolling students onto organisation site or unenrolling students from organisation sites.
Step 1: Download a CSV/Excel file with the student numbers that you wish to enrol (or remove) from SITS, or create the file manually.
Step 2: Make sure each row of the file has a different student number in the first column, with all other columns blank.
Step 3: Don't include the names or any headings, just the numbers. An example is shown below:

The next 2 steps steps my differ slightly depending on the version of Office and the Operating System you are running.
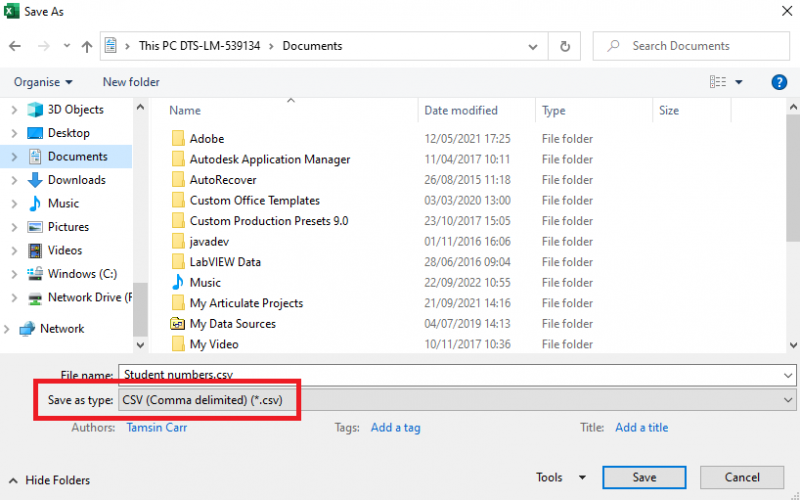
Step 4: Now click the File button and then Save As.

Step 5: Change the Save as type to "CSV (Comma Delimited) (*.csv)"

Step 6: Save the file somewhere you can get to it easily (e.g. your desktop) by clicking on Save.
Step 7: Now login to Blackboard via My Hallam.
TIP: Before progressing to Step 8, it's a good idea right now to note or copy the organisation ID in which you will be enolling or unenrolling students. You may need to look this up from the Organisations page.
Step 8: Once in Blackboard, on the Institution Page there is a channel called Blackboard Tools.
Step 9: In that channel choose the option Enrol students on organisation site.
Step 10: On the Student Enrolment Tool page:
Step 11: Enter the full Organisation ID including the year (you will need to look this up from the Organisations page). Example: stu-12345-20245
Step 12: Select Enrol students (or Unenrol students).
Step 13: Under Upload File, click Select File and select the CSV file with the student numbers.
Step 14: Click Start Enrolments (or Start Unenrolments).
Step 15: Once the enrolments have been processed, you will see a Processing Complete confirmation. Click Close.
Step 16: A list of results will display the success of failure or each new enrolmengt in the organisation site.
Step 17: If you have further enrolments to process, click Process More Enrolments and repeat from Step 11. If you have finished managing enrolments, close the panel.
You can confirm students have been enrolled (or students have been removed) successfully by checking the Users list or Grade Centre in the organisation site.
SH 25/09/23
