How do I prepare my marks spreadsheet for submission to Student Records Service? (Full guidance)
Policy
Module Leaders must collate all marks for their module and clearly indicate the marks for each task identifying the tasks and the weightings as per the module descriptor. All task marks must be submitted as a percentage out of 100 and not pre-weighted according to the task weighting.
Complete sets of internally moderated marks must be submitted on a spreadsheet to Student Records Service by the marks submission deadline. The spreadsheet must be in Excel format, adhering to requirements set out in Stage 2 (below), and it is recommended that the spreadsheet is downloaded from the Grade Centre in Blackboard.
This guide provides a detailed breakdown of each stage involved in preparing, downloading and formatting the spreadsheet with the information that Student Records Service require in the marks spreadsheet. There is also a guide that provides a summary of the information that Student Records Service require in the marks spreadsheet.
This guidance was updated on 31 May 2024.
**IMPORTANT** Please note that when downloading a copy of the full Grade Centre, columns will be missing if they are set not to be included in the Grade Centre calculations. This affects columns set up to display Text as these cannot be included in Grade Centre calculations - however these columns can be downloaded individually and subsequently inserted into a downloaded copy of the full Grade Centre. Contact the Digital Learning Team if you need support downloading the Grade Centre.
Stage 1: Prepare and download Grade Centre
Step 1: From the Control Panel, click to expand Grade Centre then select Full Grade Centre.
Step 2: In Full Grade Centre, ensure that the following columns are visible at the left of the Grade Centre spreadsheet, and in the order of, Last Name, First Name, Student ID.
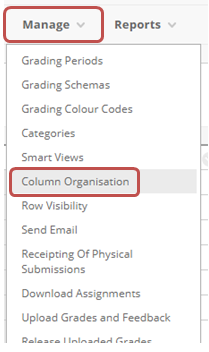
If any of these columns are not visible (or not in order), you can make them visible (or re-order them) by clicking on the Manage tab and selecting Column Organisation.
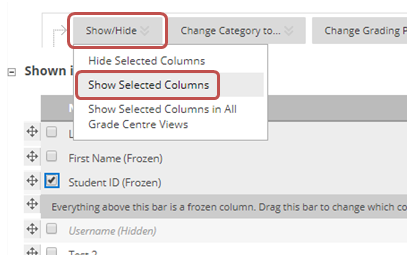
In this view you can select hidden columns (e.g. Student ID) and make them visible by clicking on Show/Hide and choosing Show Selected Columns, and/or use the cross-hair ![]() to drag the columns to the correct order. Click Submit to save changes.
to drag the columns to the correct order. Click Submit to save changes.
Step 3: **IMPORTANT** Information about University Grade Descriptors. While university systems transition to full grade-based assessment, Student Records Service still require reporting of marks in percentage form. Before returning marks to Student Records Service, staff need to temporarily hide the Grade Centre columns contaning task marks from students and revert marks back to a percentage. If you require support completing this stage of the process, please contact the Digital Learning Team.
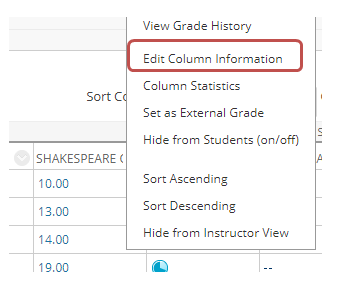
In Full Grade Centre, locate the grade column containing the assessment. Click the chevron against the grade column name. Select Edit Column Information.
On the Edit Column page, scroll to Primary Display. From the Primary Display drop-down picker select the relevant schema to convert your existing marks into a percentage. This will depend on how you entered marks initially and the existing schema in place to convert those marks into a corresponding category, for example:
- If you marked using grade points 0-16 and set the Primary Display as Grade Point to Category Conversion, you will need to update the Primary Display to Grade Point to Percentage Conversion for the equivalent level.
- If marks were generated out of 100 and the Primary Display is set as Mark Range to Category Conversion, you will need to update the Primary Display to Mark Range to Percentage Conversion for the equivalent level.
Scroll down the page and change the setting Show this Column to Students to No.
Click Submit. The student marks will now show (and download) as their equivalent percentage.
Repeat Step 3 for all assessment tasks in the module. Your Grade Centre is now ready to download.
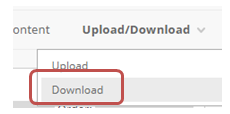
Step 4: To download your Grade Centre, click Upload/Download and select Download.
Step 5: On the Download Grades page, ensure that Full Grade Centre is selected against Select Data to Download and click Submit. You do not need to change any other options on this page, but under Save Location ensure the Download Location is set to My Computer. Ignore the 'Browse' option as this applies only for downloads to the Content Collection.
Step 6: On the next screen you will see a confirmation that the data has been saved to a file. Click the Download button.
Step 7 (a): For Chrome users: When prompted, choose a location to save the file to and click Save. Open the file from the saved location or the prompt that appears in the bottom left of the screen.
Step 7 (b): For Safari users: Open the file from the Downloads folder.
Step 7 (c): For Firefox users: When prompted, click Open with Excel.
Before the file opens, you will see a prompt that your file is in a different format than specified by the file extension. Click Yes to open the file now.
Step 8: You will see a spreadsheet version of your Grade Centre. Save this file to a local drive. You will see a warning that the file may contain features that are not compatible with Unicode Text. Click No. This will automatically prompt you to save the file in Excel format. By not renaming the file, it will automatically contain the module code.
Step 9: Having generated your spreadsheet it is important to undo the temporary changes you applied in Step 3. If you require support completing this stage of the process, please contact the Digital Learning Team.
In Full Grade Centre, locate the grade column containing the assessment. Click the chevron against the grade column name. Select Edit Column Information.
On the Edit Column page, scroll to Primary Display. From the Primary Display drop-down picker select the relevant schema to revert your marks back to the original display. This will depend on how you entered marks initially and the schema applied to convert the marks into a percentage. For example:
- If you marked using grade points 0-16 and set the Primary Display as Grade Point to Percentage Conversion to convert the marks into a percentage, you will need to change the Primary Display back to Grade Point to Category Conversion for the equivalent level.
- If marks were generated out of 100 and the Primary Display is set as Mark Range to Percentage Conversion to convert the marks into a percentage, you will need to change the Primary Display back to Mark Range to Category Conversion for the equivalent level.
Scroll down the page and change the setting Show this Column to Students to Yes.
Click Submit. The student marks will now revert to their original display.
Repeat Step 9 for all assessment tasks in the module.
Stage 2: Prepare your marks spreadsheet for Student Records Service
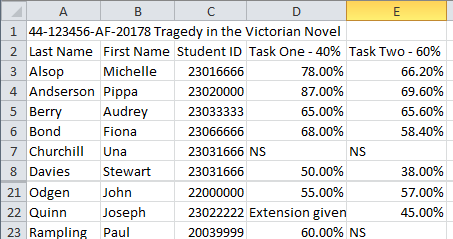
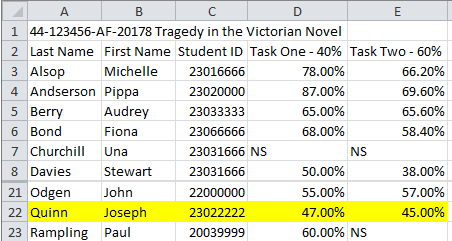
Step 10: Ensure only the following columns and information are present in the spreadsheet:
- Module code and module title. Insert a blank row at the top of the spreadsheet and type in the module code and title. (Select the top row, right-click and select Insert).
- Student last name, first name and ID. This will be automatically contained within the downloaded spreadsheet. (The spreadsheet must be sorted alphabetically by student last name).
- Task number and weighting in task order. Rename each column header to identify the relevant task number and weighting and arrange in task order as on the agreed module descriptor. Subtask marks should be aggregated and calculated at the task level before returning to Student Records Service – individual subtask marks should not be returned.
Step 11: Delete all other columns (e.g. student usercode, last accessed, availability, calculated columns not at the task level, subtask and formative mark columns, and columns containing non-assessment information).
Step 12: Check and correct student marks as follows:
| Category | Information required |
| In Module Retrieval Mark | Cap at the minimum pass mark in the relevant cell of the mark column |
| Student has submitted late but within 24 hours of the deadline | Cap at the minimum pass mark in the relevant cell of the mark column |
|
Student has attempted, but not passed |
Enter a mark between 1-100. Zero will be treated as a non-submission |
| Non-submission of coursework / Non-attendance at examinations |
Where zero is entered as the result of a non-submission or non-attendance, either:
|
| No marks / Missing marks |
Where there are missing marks, an explanation of why they are missing is required, by either:
|
| Extensions (Marks not yet due) |
If marks are coming in later for students with extensions, make this clear by either:
|
Step 13: Save the file to a local drive. Your marks spreadsheet is ready to send to Student Records Service.
Stage 3: Submitting marks for students with extensions
Step 14: If marks are being submitted for students with extensions, you should re-use the marks spreadsheet created during Stage 2. Open the file saved in Step 11.
Step 15: Replace the text ‘extension given’ with the relevant mark for each student with extension and highlight the entire row(s) in yellow.
Step 16: Save the file. Your updated marks spreadsheet is ready to send to Student Records Service. Make it clear in the body of the email that the marks being submitted now are for students with extensions.
Stage 4: Follow on actions that are completed by Student Records Service:
Once your marks spreadsheet has been received, Student Records Service will:
- Enter marks against module records in SITS
- Complete data quality checks in relation to student module outcomes including the application of outputs from ancillary processes such as Extenuating Circumstances Panels and Academic Misconduct Panels to student module results
- Calculate progression outcomes and compensation for students in preparation for the DAB
- Calculate awards for students in preparation for the DAB
- Produce and publish reports for modules and courses to enable Review of Reports meetings to be held and in preparation for the DAB. Please note: on receipt of these reports Module Leaders are NOT expected to complete a line by line check of the module data as this is checked for transcription errors on input, however if any issues are identified please contact your Academic Administrator
SH 31/05/2024
