How do I post/create a new announcement?
Announcements post timely information critical to module success. The Instructor can add, modify, and remove announcements via the Announcements tool in the Control Panel. This tool is ideal to post time-sensitive material such as:
- When assignments are due
- Changes in the syllabus
- Corrections/clarifications of materials
- Exam schedules
When adding an Announcement, Instructors can also send the Announcement as an email to Students in the site. This ensures that Students receive the announcement even if they do not login to the site.
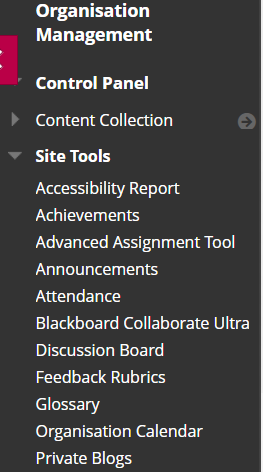
Step 1: In the Control Panel, select Site Tools, then select Announcements.

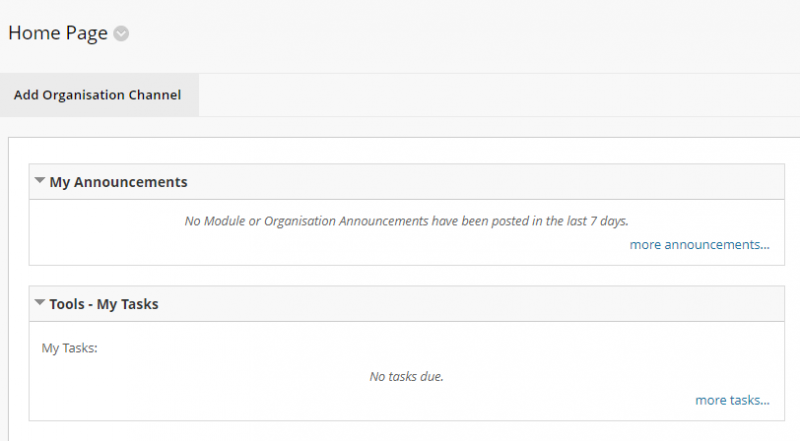
Alternatively you can access announcements from the module home page announcement channel and selecting the "more announcements" link.

Step 2: Click the Create Announcement button.

If you do not see this button, make sure Edit Mode is ON. The Edit Mode control is located in the top far-right of most pages.
Step 3: On the Create Announcement page, at a minimum enter a Subject.
Options on this page are described at the end of this article.
Step 4: Select the checkbox next to Display After. This box must be selected in order to create an announcement. If you want the announcement to appear immediately than you simply need to select the box. If you wish the announcement to appear in the future then you should also change the date/time after the box.
Step 5: Click Submit.
Create Announcement Options

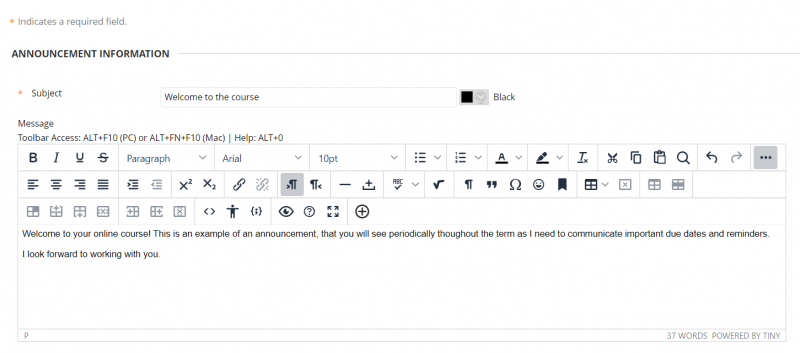
Using this example:
Step 1

Subject is required and is the first line of the announcement; keep it brief. Click the drop-down arrow to choose a different colour for the subject line.
Message: type directly into the field or copy and paste text from another word processing document. With the Visual Text Editor, announcments can not only contain formatted text, but images, multimedia, and links. Announcements can be saved as Reusable Objects and stored in the Content Collection.
If the Visual Text Editor is not showing, go to My Places > Personal Information to set your global availability of the editor

Under duration do NOT select Permanent, as the announcement will not show up correctly in some areas.
Select Date Restrictions (for Date Restricted option): optionally set a beginning and ending date/time for the announcement. If you do not set any date restrictions, then the announcement appears in the order it was posted. If a future time is set, select Display After to show the announcement then. If it should expire on a certain date, select Display Until which removes the announcement on the specified date and time.
Override User Notification Settings: select this option to send an email to all users with a link to the announcement. This will ensure that all users are aware of the Announcement even if they do not access this course.

Internal Link: you can create a link within the announcement text to an item in the site. Click Browse to view the Site Map and select the item to link to. If the link points to a content item that is not available, the link will not appear in the Announcement until the content is available. Note that removing the content will remove the link to the content in the Announcement but the Announcement itself will remain.
When finished setting up your announcement, click Submit to create it.
Announcements appear in the order that they are posted, with the most recent appearing first, unless an instructor manually reorders them and/or if there are ones marked Permanent. Links to announcements are also displayed in the following areas of the system:
- My Announcements channel, which may be a part of the Home Page in the site
- Beneath the site title on list of Blackboard Sites in shuspace
- It's a good idea to include a welcome message on blackboard for the students coming to the site for the first time. However, make sure you set the announcement to expire in a few weeks, because as the semester goes on the welcome message will be taking up valuable announcement space for you to communicate with students, and will no longer be necessary.