Customising the Site Menu
You can easily add, remove or hide from students menu items on your site's left-hand menu. Content areas are the menu item types which are most commonly used. They allow you to add various types of content, including files, folders, web links, tests, surveys, assignments, wikis, blogs and RLOs.
However, if you want students to be able to access a discussion board, staff contact details, announcements, or their grades, then you need to add a tool link instead.
Adding an item to the site menu
Step 1: Ensure edit mode is on (upper right hand corner of page)
![]()
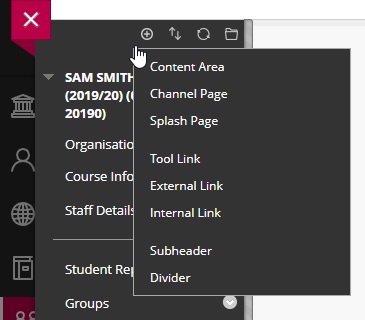
Step 2: Click on the + to select what type of area you want to add

- A Content Area will contain files and folders
- A Channel Page will help create a new front page with automatically generated information drawn from SHU resources
- A Splash Page will create a blank webpage which you can edit
- A Tool Link will take you directly to a Blackboard tool such as Collaborate
- An External Link will take you to an external website
- An Internal Link will take you to a page on the site
- A Subheader will give you a section header on your menu
- A Divider will section off different areas of the menu to help with navigation
Step 3: Give the area a name
Step 4: By default any new areas are unavailable to students - to change this tick the box make available to users
Step 5: Click Submit.
Deleting or hiding an item from the site menu
To delete or hide an item from the Site Menu, hover over the item until the downward chevron is seen, clicking on this will give you a range of options including Delete and the ability to Hide Link from Students.
Renaming items in the site menu
Step 1: Click the v icon next to the item you want to rename, a drop down menu appears.
The v icon is situated on the right side of the site menu item.
Step 2: Choose the Rename Link option
Step 3: Type in the new name of the item
Step 4: Click the ✔ icon to save changes.
The ✔ icon is situated on the right side of the site menu item.
The ✕ icon will cancel the changes made to the site menu item.
The site will reload with the new changes made.
Reordering items in the site menu
Step 1: Click and drag the ↕ icon next to the site menu item you want to move to the location where you want the item to appear.
The ↕ icon is situated on the left of the site menu item.